
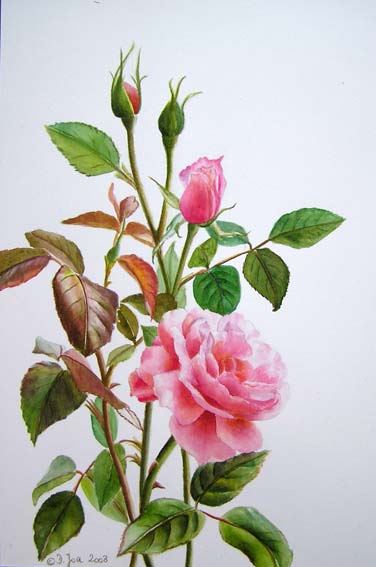
pink rose step by step demonstration -Free tutorial by Doris Joa

I did the drawing for a new Rose painting.
It is a Pink Rose with a lot of leaves and three buds and a tiny mini bud. So I think this rose is perfect for you to learn how to paint a rose.
I will paint this Rose on 140 Lb hotpressed Watercolor Paper. Usually I always stretch my paper, but I want to try new things. So this time I will paint directly on the blog without stretching and see how it works. Will it make a difference when the paper is untouched and was not yet in water? Hmmm … I am really curious.
I will do this Rose demonstration painting with a white background. I have done a photo of the drawing, so it will give a good suggestion how it looks. But it also can be that I will change some of the leaves during the paint process, add some more, change the angle, form and so on.
Colours for a pink rose
For my pinks I will use Transparent Rose from W&N, Alizarin Crimson from Schmincke, some Indian Yellow and Phthalo Blue (both are also from Schmincke). Of course I will not forget to add some green of the leaves on the flowerpetals, to get colourharmony. As you know each subject is reflected by things arround it, so I will also add some pinks on the leaves later.
I will make some photos of the painting process. I am sorry when the photo of the drawing is not better, I just made light pencilstrokes, which I also will erase before adding the colours. I do not like to see later the pencildrawing.
I will start at first on the big mainflower and then I also will start with working on the leaves.
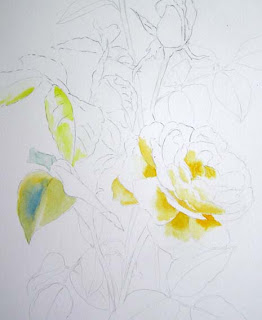
 Starting with underwashes


I have started with painting the rose.
In the first photo you can see that I have already some yellow underwashes.
I used Indian Yellow on the Rose – where I think where the warm areas are.
I then used also Indian Yellow on some of the leaves, but I also used Aureolin (a cool yellow) on other leaves.
In my previous post I made a mistake. I do not use Transparent Rose, the right name of the colour from Winsor and Newton is Permanent Rose. I am sorry for this mistake.
Did I already tell you that this rose composition is done from several photos which I did about this Pink Rose? Although I worked a bit on photoshop for the composition, the rest was created when I did the drawing. So I really have no real idea how this painting will look like when it is finished.
This is always an interesting part to see how the painting will develops.
So while painting I think it will help when I add more and more colours on different parts and not only concentrate on maybe the rose.
Colour mixes
In the second photo you will see that I have add some colours. For the warm areas on the Rose (where also the yellow underwash is) I added a mix of Alizarin Crimson and Permanent Rose. For the neutral tones I used only the Permanent Rose and for the very cool areas I use the Permanent Rose mixed with Phthalo Blue.
On the leaves I am using yellow as mentioned above and also Sap Green (from Daniel Smith). I also added Alizarin Crimson there and of course Phthalo Blue is also used. I have a wonderful Turqoise Colour in my box (Helio turquoise from Schmincke), which is a beautiful colour, so maybe I will work with this colour too on cooler areas. I love Turquoise colours.
I am so excited about this Rose painting, but I must be careful. I tend to overwork often some areas and then it can happen that I am loosing the whites so I always must stop myself. LOL
Also it is great to drop in the colours instead of doing brushworks. I mean wet the area and then drop the colour in and it will flow naturally.
I will go on and adding more colours now.

I have worked further on this Pink Rose Watercolor painting. More leaves are painted and the main rose is also finished. I really love what I have done yet and I am very pleased about this Watercolor painting.
It also makes a lot of fun to paint on the unstretched paper in the blog. I never have done this with hotpressed paper before and a fellow artist told me that she always did this and never got any buckles, so I needed to make things easier for me, instead of wasting my time with wetting, stretching, dryingtime etc.
I painted with the colours, which I mentioned before on the leaves as on the Rose.
Since this painting will have a white background, then it will be a botanical Rose painting.

The Rose Painting is finished.
It is only painted with transparent watercolors and I used all the colours which I mentioned before.
At first I was worried a bit about the composition and I had to cut some of the white area on the right side, it did not look good. But now as it is I really love it to have this painting in this way.
It worked also absolutely great on the unstretched hotpressed paper – it did not buckle in any way.
Thank you Doris,
I am always looking for more information. How do other artists do. Your explanation has helped me to understand how to get the glow in my flowers. Wish you much painting excitement. What a wonderful passion we have.